Instruction Notice for Address Book and Archives

Note: This is an instruction manual for the address book and archive functions in hikyaku mailer. "How to send and receive mails by hikyaku mailer" being explained in the first part of the manual, we explain here only how to use its address book and archive functions. If you don't know our service, please display hikyaku's main page to learn it. Don't hesitate to send us your feedback if you have encountered any problems by using our program.

to Japanese

Contents

  1. Switching to the address book
  2. General Presentation
  3. Initializing your address book
  4. Listing your address book
  5. Inserting and extracting an address record
  6. Erasing and deleting an address record
  7. Archive mode
  8. Saving and restoring messages

  1. Switching to the address book


    You can switch to the address book from other parts of the program simply by clicking on the popup menu on the top-left corner. Please note that the first appearance of the address book is fairly slow (it may take 1 minute to display), but once it has been installed in the memory, you can switch back more quickly.
  2. General Presentation


    The panel of address book is composed of 2 sub-panels. The left one contains a temporary information and valid only during a session. Meanwhile the right one is the image of your address book in hikyaku server and consequently permanently available. Only the left panel is editable and directly modifiable. You modify the right panel by copying the information from the left panel: "Insert RC" button sends the selected record to the right panel (it may need about 1 minute). Each record contains 3 fields: name, mail address and associated comment. The length of a comment is limited to 128 characters and only Roman characters are supported for the moment. If your correspondent name begins with =?iso-2022..., it is in Japanese characters. Though the current version of hikyaku is unable to display correctly correspondent's name in Japanese characters, the information itself is valid. Please keep it in your address book without any modification, if you wish to send him a message with his Japanese name.
  3. Initializing your address book


    The first acte you have to do by arriving in this part of the program is to create your own address book. Fill up your user name and password on the top left panel in the same manner as sending a message. then push on "Create DB" button. If the username/password couple is recorded in the hikyaku server, the program will create a database of your address book. Initially the database contains no record but you can fill it up until 100 records. Please note that you need to push this button only once in your life.
  4. Listing your address book


    You can list the content of your address book by pushing "List DB" button. The popup menu on the top-right allows to choose how to display the list. "Sort by date/time" displays the records in the chronological order of insertions. "Sort by address" displays the records in the alphabetic order of addresses. "Sort by name" displays the records in the alphabetic order of correspondent names.
  5. Inserting and extracting an address record

    From "Outgoing mail mode" or "Incoming mail mode", you can copy the address information of your correspondent by pushing "to Address" button. Coming to the address book panel, you will see the address information is copied on the left sub-panel. Select it and add eventually a comment then click on "Insert RC" button. The program will copy the selected record to hikyaku server to make it permanent. Please verify that the copied record should appear on the right side.

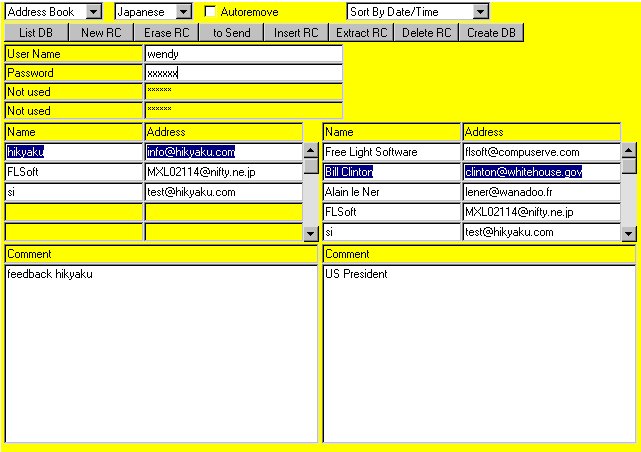
    Inversely, "Extract RC" button allows you to copy a selected record from the right panel to the left. Click then to "to Send" button to copy the address information on to the message you are going to send. By coming "Outgoing mail mode", you will see that the destination address and the correspondent's name have been effectively copied.

  6. Erasing and deleting an address record

    There exist 2 buttons which look like similar. The "Erase RC" button rubs out simply from the left panel a selected record, while the "Delete RC" button deletes from hikyaku server a selected record, then updates the screen display on the right panel. Please note that "Erase RC" carries out only on the local computer and the response is very quick, while "Delete RC" carries out on a remote computer and consequently it takes a little time to get an updated display.
  7. Archive mode


    The pop-up menu at the top-left corner allows also to go to "archive mode". "Save Button" is used for saving your messages into hikyaku server while "Restore Button" for restoring the saved messages. "Delete Button" suppresses the selected file from the server, each file containing one message. Finally "to Send Button" is used for copying the restored message on to "outgoing mail mode's panel" in order to send it to your correspondent.
  8. Saving and restoring messages


    By pushing on "Save Button" in archive mode, you can save the selected message into hikyaku server. Please note that the operation may take a little moment because the program send it to a remote machine and not to a local one. By default, the file name is "ML" followed by the date (4 digits for the year) and the time of backup but you can choose any other name. "Restore Button" carries out exactly the same operation in the opposite direction, i.e. to restore the saved messages from hikyaku server. Before restoring a message, push on "List Dir" button in order to list the directory where all the files are stocked, then select the file name where your message is stocked.

Back to the Japanese E-mailer (Hikyaku)


www.hikyaku.com/jpmail/admanu.html
Write to Free Light Software
Last update: March 31, 2001